Location
Mount Vernon, WA 98274
Location
Mount Vernon, WA 98274
High-efficiency milling (HEM) revolutionizes subtractive manufacturing by balancing shallow radial cuts with deep axial engagement, reducing cycle times and extending tool life. Discover how to select the right end mills, fine-tune feeds and speeds, and program trochoidal toolpaths to achieve exceptional surface finishes and productivity on your CNC machine.
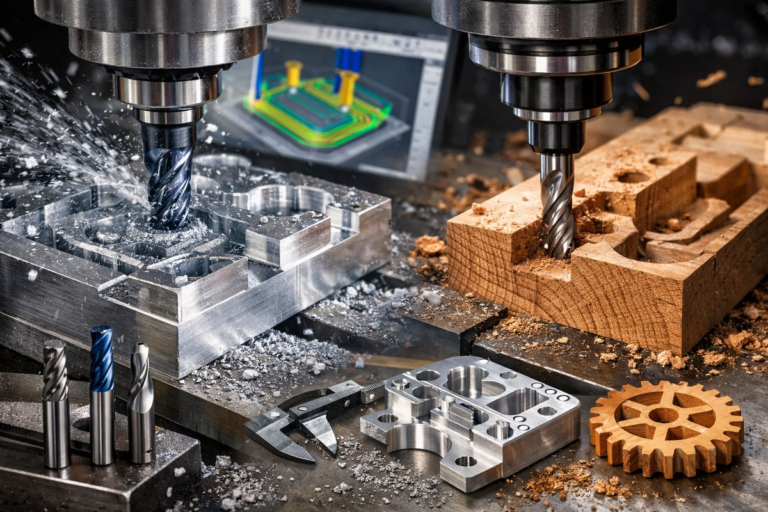
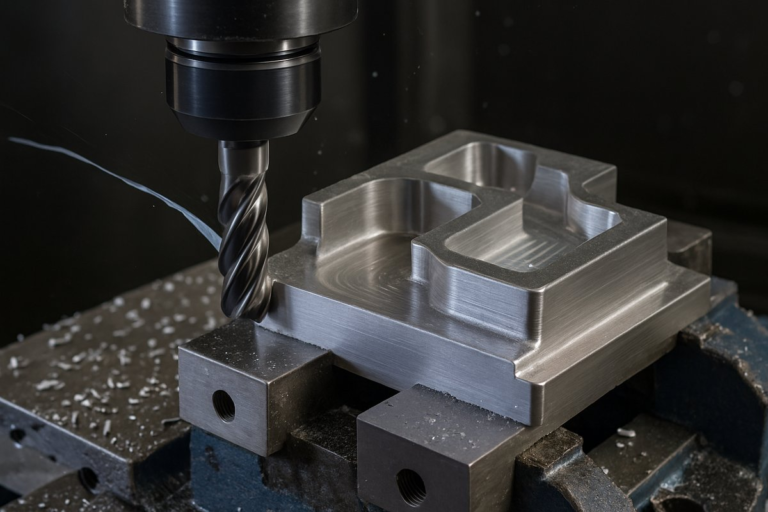
Subtractive manufacturing finds its ultimate expression in high-efficiency milling, an advanced strategy that transforms blocks of metal, plastic, or wood into precision parts through carefully controlled cutting. Unlike conventional milling, high-efficiency milling (HEM) relies on shallow radial depths of cut combined with high axial engagement, allowing the tool to remain at full cutting speed, delivering remarkable productivity and enhanced tool life. Whether you run a hobbyist CNC router or a professional-grade milling center, mastering HEM can shave hours off production cycles while improving surface integrity and dimensional accuracy. This guide walks you through each step of the process, from tool selection and machine setup to CAM strategies and finishing passes, so you can confidently integrate HEM into your workflow.
High-efficiency milling excels at balancing cutting forces and heat distribution. By engaging less material per revolution in the radial direction, the load on each flute remains consistent, reducing vibration and tool deflection. Simultaneously, maintaining a deeper axial cut allows large volumes of material to be removed quickly without overstressing the tool. The result is a significant reduction in cycle time, extended tool life, and superior surface integrity-qualities that matter when machining aerospace components, automotive molds, or ergonomic prototypes. These benefits make HEM an indispensable technique for shops looking to boost productivity and maximize the return on their tooling investment.
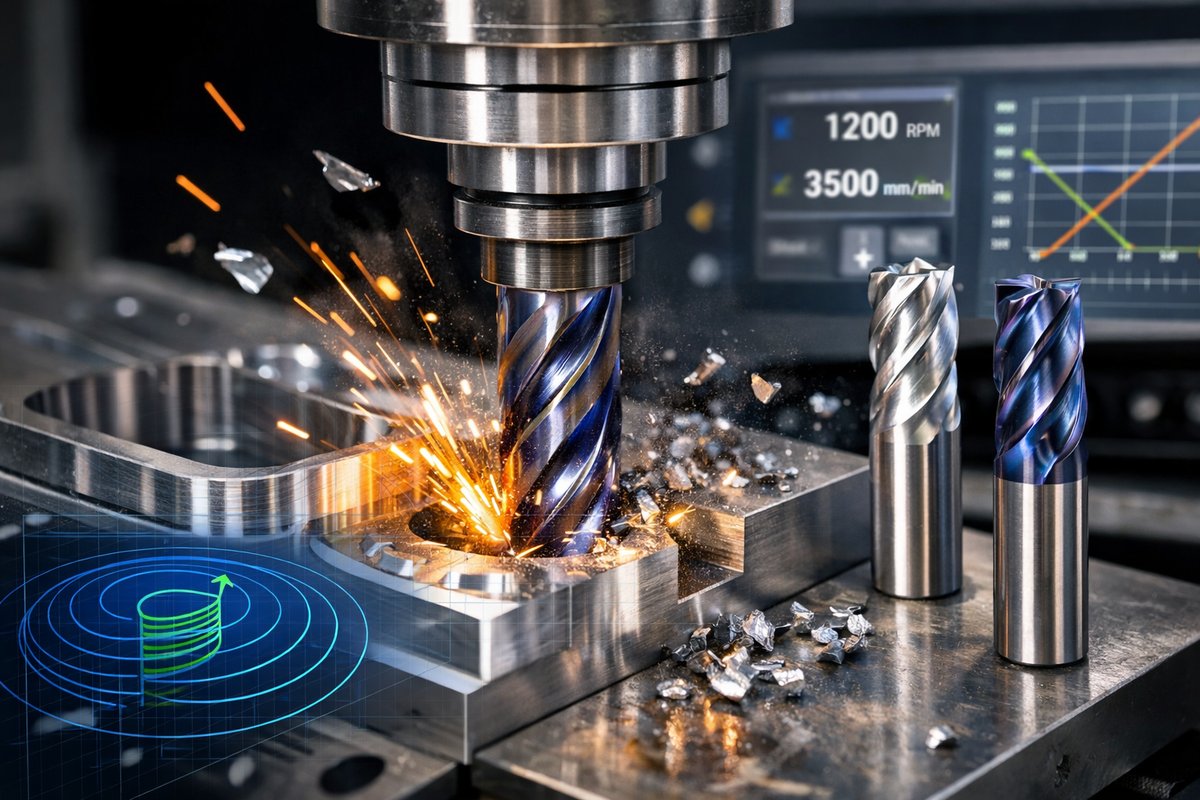
The cornerstone of high-efficiency milling is selecting the right end mill. Multi-flute end mills-especially 4-flute or more-distribute cutting forces evenly and help maintain stability at high speeds. Seek out tools with polished flutes and a robust core diameter to withstand the demands of deep axial engagement. Carbide end mills coated with heat-resistant finishes such as TiAlN or AlTiN dissipate thermal energy more efficiently, resist abrasion, and extend tool life. When determining the diameter, consider the rigidity of your machine and the density of the stock; smaller end mills excel at intricate contouring, while larger diameters achieve rapid bulk material removal.
Securing tools with minimal runout is equally important. An ER-32 collet chuck set provides precise gripping and excellent concentricity-key factors for consistent tool performance in HEM applications. Collet chucks accommodate a variety of shank sizes, giving you flexibility to experiment with different tool diameters. Inspect collets regularly for wear or deformation, since even minor imperfections can introduce chatter or lead to premature tool failure. For setups that demand even tighter tolerance, hydraulic tool holders offer additional damping, though they come at a higher cost and may require specialized maintenance.
Machine setup begins with stable workholding. A rigid vise or modular fixturing system keeps stock from shifting under heavy cutting loads. Prior to mounting your part, thoroughly clean the table and mounting surfaces to eliminate debris that could compromise accuracy. Use parallels, step blocks, or dedicated fixtures to support your workpiece and prevent distortion. Level the stock using a surface plate or an edge finder, ensuring each axis is within the machine’s tolerance. Check spindle runout with a dial test indicator, and input precise offsets into your CNC control. Taking these preliminary steps pays dividends in repeatability and finish quality when machining complex geometries.
With the hardware ready, it’s time to tackle CAM programming. High-efficiency milling strategies often leverage trochoidal toolpaths-circular or elliptical arcs that maintain a constant engagement angle between the tool and stock. This contrasts with traditional zigzag roughing, where the end mill plunges in and out at full depth, risking tool overload and heat buildup. In your CAM software, set a small radial step-over-generally 10-20% of the tool diameter-and specify the maximum axial depth your spindle can handle. This approach keeps the tool engaged in a shallow, consistent slice, promoting efficient chip evacuation and thermal stability.
Optimizing feeds and speeds is critical for extracting maximum performance from your HEM setup. High spindle speeds-common on modern CNC machines-paired with moderate chip loads per tooth yield the best balance of productivity and tool longevity. Start with manufacturer recommendations, then fine-tune based on observed chip size, surface finish, and machine feedback. Aim for well-formed, curly chips that break cleanly; excessively long or powdery chips signal improper settings. Advanced CNC controllers with real-time monitoring can adjust feed rates automatically, smoothing out variations in stock hardness and further protecting your tooling.
Effective chip evacuation and cooling are vital to prevent heat accumulation at the cutting edge. Flood coolant systems deliver a continuous stream of fluid to wash away chips and maintain temperature control. If your shop lacks centralized coolant, a portable spray mist or through-spindle coolant setup can be an affordable alternative. Proper coolant application not only extends tool life but also enhances surface finish by minimizing material adhesion on the cutting edges. Position chip brushes or air jets to clear debris between passes, ensuring unobstructed cutting and consistent tool engagement.
Now you’re ready to initiate the roughing pass. Begin the program at half the intended feed rate for the first few inches of travel to verify chip formation, coolant flow, and machine response. Listen for consistent spindle noise-any chatter or sudden load spikes may indicate runout or an improperly secured workpiece. If everything checks out, proceed with the full programmed speed. Monitor the cut periodically: inspect tool wear under a magnifying loupe, verify dimensions with a dial caliper, and adjust feeds or coolant if you observe deflection or chip welding.
After the roughing phase, transition to a finishing tool-often a 2- or 3-flute end mill with a small corner radius-to achieve the desired surface quality. A light climb milling pass with minimal radial engagement and shallow axial depth produces crisp edges and smooth contours. Reduce feeds and speeds relative to the roughing operation to avoid overloading the smaller finishing tool. Confirm final dimensions using precision measuring instruments such as micrometers or height gauges. For critical surfaces, consider a polish finish pass with a mirror-coated end mill, which can further reduce friction and leave a gleaming, burr-free surface.
Maintaining equipment longevity and safety underpins every successful HEM implementation. Inspect tools regularly for chipping or rounding-replace them at the first sign of wear to preserve finish quality and dimensional accuracy. Keep tool holders, drawbars, and collets clean and lightly lubricated to prevent slippage or inconsistent torque. Always wear safety gear-impact-resistant glasses, hearing protection, and gloves rated for machining environments. Utilize vacuum systems or chip conveyors to manage debris and reduce cleanup time. By embedding these maintenance and safety practices into your routine, you’ll protect both your investment and your well-being.
High-efficiency milling empowers you to transform raw stock into precision components faster, more reliably, and with higher surface quality than ever before. By selecting the right end mills, securing tools with precision collets, meticulously setting up your machine, and programming trochoidal toolpaths, you’ll unlock new levels of machining performance. Whether you’re crafting functional prototypes, specialty fixtures, or high-volume production parts, the principles outlined here will guide your journey toward exceptional efficiency and finish. Embrace the process, refine your parameters, and watch as your subtracted shapes emerge with unparalleled clarity and precision.