Location
Mount Vernon, WA 98274

Location
Mount Vernon, WA 98274
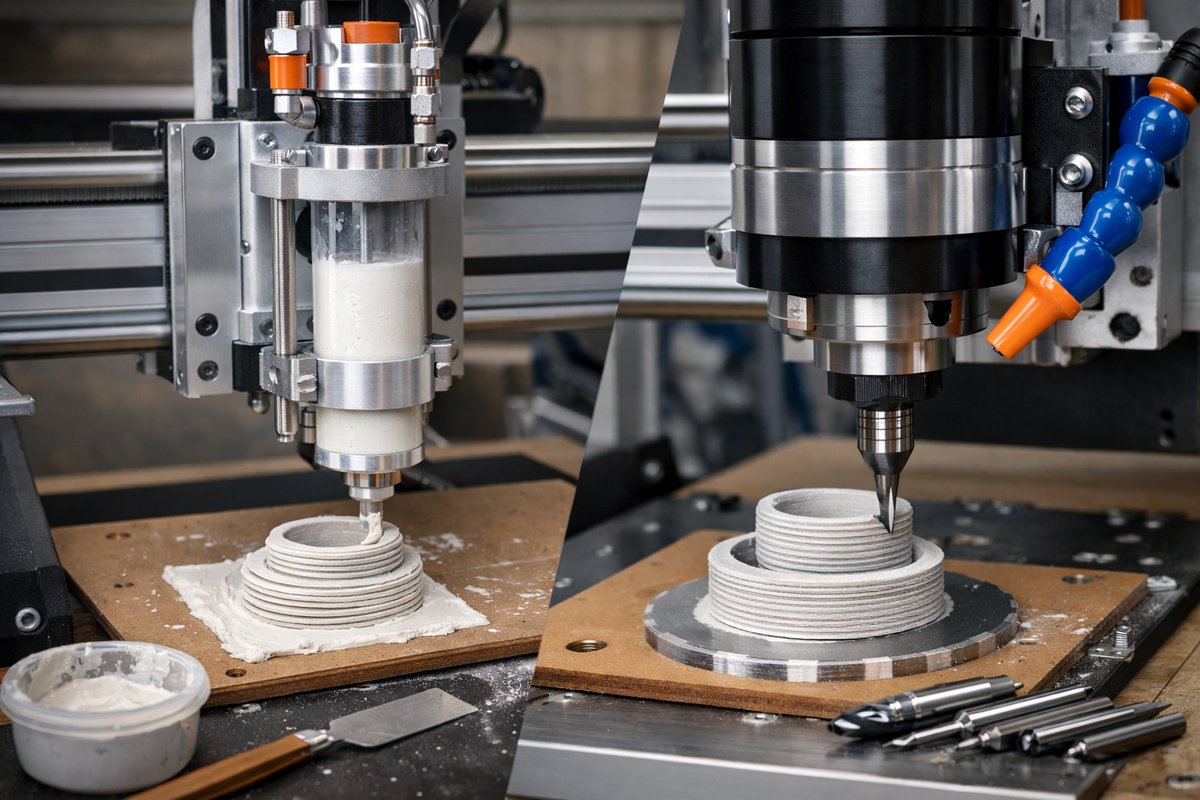
Discover how to transform a standard CNC router into a hybrid additive manufacturing platform. This guide reviews the paste extruder technique, explains setup and calibration, and shows how to use precision end mills for finishing passes.
Additive manufacturing often brings to mind desktop filament printers or industrial metal sintering systems, but what if you could repurpose the very CNC router on your shop floor to build layer by layer? By swapping out the spindle for a paste extruder head, a traditional subtractive machine becomes a hybrid platform capable of depositing material and then carving it back to perfect form. This approach combines the consistency and precision of your CNC gantry with the versatility of extrusion, opening doors to bespoke prototypes, artistic flourishes, and complex geometries that resist standard routing alone.
The heart of this process lies in a simple yet robust modification: mounting a syringe-based extruder in place of the usual end mill. Instead of spinning a bit through hardwood or aluminum, the extruder deposits a steady bead of thermoplastic, clay, or even food-safe polymer. Once the layers build to the desired height and shape, you swap back to a carbide or high-speed steel end mill for contouring and surface finishing. The result is a part that benefits from the best of both worlds.
Gathering your components takes only a handful of items: a paste extruder kit designed to mount on standard CNC mounts, a compatible stepper motor and driver, the nozzle and syringe assembly, and of course the array of end mills for cleanup work. With everything in hand, the first step is mechanical integration.
Slip the extruder onto your router’s mounting plate, securing it with the same T-slot bolts that hold your regular tool. If your machine uses a quick-change collet system, use the matching adapter to fit the extruder body in place of a cutter. Next, wire the stepper motor to your controller, assigning it to the spindle port or an auxiliary axis. Most open-source firmware allows you to repurpose an axis for extrusion control. Set the micro-step resolution to 1/16 or finer to ensure smooth flow, and configure the steps per millimeter to match the barrel and plunger geometry of your syringe.
Once the extruder is physically attached, it’s time to test movement and flow. Load a benign material-water-based clay or modeling paste works well for dry runs-and flush it through the nozzle. Jog the toolhead to familiar positions and fire short extrusion commands, observing the consistency of the bead. Tweak the pressure rate in your control software so that a one-centimeter move deposits a perfect one-centimeter line of material, neither over-extruding (which swells and blobs) nor under-extruding (which pulls threads).
When your calibration lines look crisp and uniform, prepare the actual workpiece. Secure a flat spoil board or sacrificial platform to the router table; this not only protects the machine’s surface but also allows for minor Z adjustments without risk. Level the bed as you would for any precise milling operation, but keep in mind that your first layer of paste will compensate for slight unevenness. Apply a thin film of release agent or painter’s tape if adhesion to the paste proves too strong.
Generate your toolpath with a dual-mode workflow in your CAM software. Assign the extrusion head for the rough outline and infill passes, controlling layer height and bead overlap just as you would on a dedicated 3D printer. Set a modest layer thickness-0.5 to 1.0 millimeter-so each pass bonds well, yet the layers still cure quickly. Once the additive passes finish, swap to a ball-nose or flat-end mill for the finishing sequence. In the same CAM file, program a contour pass that cleans up surfaces, rounds edges, or adds engraved details. This blending of G-code commands ensures a seamless transition between adding and carving.
Begin the build. Engage the spindle or extruder prime routine to purge air pockets, then start the first layer program. Watch as your CNC router glides along calibrated paths, building ridges of paste that solidify into a cohesive block. Layer by layer, the model rises, and you can monitor extrusion behavior just as you would on a printer, adjusting feed or retraction on the fly if necessary. Once complete, pause the machine and swap tools manually or through an automated carousel system, then resume machining to refine the form.
Finishing is where the subtractive heritage shines. A well-chosen carbide end mill can remove imperfections, polish faces, and introduce precise details that are impossible to achieve with extrusion alone. For organic curves, opt for a ball-nose end mill in a fine flute count; for crisp edges and flat surfaces, choose a sharp two-flute cutter. Take multiple light passes at moderate spindle speeds, letting the tool glide through the material without overloading either mill or part.
After completing the final pass, power down and remove the workpiece. A soap-and-water rinse or a gentle brushing often eliminates minor burrs or deposits. Inspect the geometry against your original model and note any tolerances that drifted-fine-tune your CAM settings or extrusion calibration for the next run.
This hybrid workflow offers distinct advantages. First, it utilizes the rigidity and repeatability of your CNC machine, meaning you can deposit pastes or pellets with the same positional accuracy you expect from metal milling. Second, the additive approach conserves material; you create near-net shapes that require minimal cutting stock. Third, you unlock new possibilities for custom tooling composites, biodegradable polymers, ceramic pastes, or even chocolate in culinary applications.
Whether you’re prototyping aerodynamic fairings, crafting topographical maps, or experimenting with conductive polymers for electronics housings, this method scales from hobby workshops to small manufacturing cells. The initial investment is modest if you already own a CNC router-most extruder kits and nozzles cost a fraction of a dedicated 3D printer. Maintenance consists of cleaning the syringe barrel and replacing worn nozzles, tasks you’re already familiar with in subtractive tooling.
As you refine your hybrid additive-subtractive practice, consider expanding your toolkit. Specialized hard coating end mills can tackle cured epoxy pastes, while diamond-tipped burs excel at carving cured clay composites. Heated beds accelerate layer bonding for thermoplastics. Integrated vision systems can monitor bead quality in real time, triggering adjustments to extrusion flow or layer height.
In the end, the core lesson is adaptability. By merging additive and subtractive methods on a single CNC gantry, you multiply the creative and practical potential of your shop. You transition smoothly from layering to carving, harnessing the emotional satisfaction of watching an object emerge piece by piece, then refine under a whisper-quiet router bit. This balance of patience and precision, innovation and tradition, defines modern machining at its most versatile.
Ready to take the plunge? Gather your extruder, pick up some paste or filament, and dust off those end mill shanks. The same machine that cuts your prototypes can now build them too. With every layer deposited and every face milled, you’ll deepen your understanding of toolpaths, material flow, and the quiet discipline of crafting purpose through subtraction and addition alike. The next time you revisit a design, you won’t have to choose between printing or milling-you’ll simply do both.












